最近在做毕设的后台管理系统,需要用到图片上传,于是就需要使用封装好的组件来上传(比较好看),这里整个后台管理系统使用了element-ui组件,故上传组件则使用了里面的el-upload组件,下面讲讲我使用这个组件及所遇到的问题吧
首先,先说说参数,以下是我用到的基本代码
<el-upload
              ref="foodUpload"
              :http-request="customUpload"
              name="img"
              class="upload-demo"
              action="修改接口"
              :data="myData"
              :headers="myHeader"
              :on-success="handleSuccess"
              :on-remove="handleRemove"
              :file-list="img"
              :on-change="checkFile"
              list-type="picture"
              :auto-upload="false"
              :limit="1">
              <el-button  size="small" type="primary">点击上传</el-button>
              <div slot="tip" class="el-upload__tip">只能上传jpg/png/jpeg/svg文件,且不超过5M(注:想要更换图片需先删除原来图片哦)</div>
            </el-upload>
:http-request是指自定义上传的动作,需要搭配:auto-upload="false"关掉自动上传。
:data="myData"是你在上传文件时所需附带的参数,像你在修改一个商品数据时,除了商品图像,你还需传商品id等,:headers="myHeader"则是请求头所需带的参数,如token。注:myData, myHeader都是在computed属性里的。
:action 则是上传文件的后台接口url
accept属性的值可以是accept="image/gif, image/jpeg, text/plain, application/pdf" ,限制文件格式。
file-list 是文件列表,可搭配 limit 限制上传文件数量.
list-type 是指定列表显示类型,可以是图片也可以是文字。
show-file-list 是否显示已上传文件列表
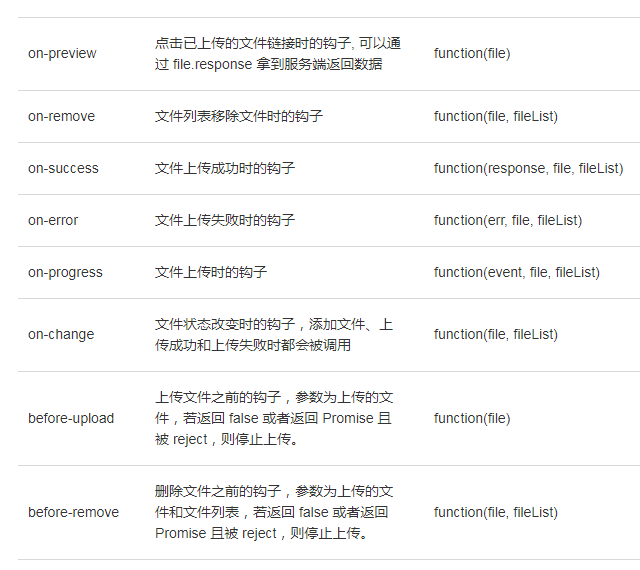
接着是各种钩子或者事件吧,具体看官网。
我此项目是需要上传或者修改一个商品图像,因为修改时还需修改一些其他字段属性,不仅仅只有图像。如果设置了自动上传,那我在修改商品信息时可能就要请求两次接口,那我就在想只请求一次就好,故需要延缓提交上传,在点击修改按钮时才提交上传(submit()),并且通过:data属性附加一些修改数据,实现一次请求上传。当中我通过on-change钩子判断文件大小,从而限制文件大小,通过on-success函数处理成功上传后的动作,on-remove来处理删除文件后处理的动作。具体代码如下:
 computed: {
    myData () {
      return {
        id: this.food.id,
        food_name: this.food.food_name,
        fixed_number: this.food.fixed_number,
        food_money: this.food.food_money,
        level_id: this.food.food_level.id
      }
    },
    myHeader () {
      return {
        token: window.sessionStorage.getItem('token')
      }
    }
  },
methods: {
// 自定义上传
    customUpload (content) {
      let param = new FormData()
      param.append('img', content.file)
      param.append('id', content.data.id)
      param.append('food_name', content.data.food_name)
      param.append('fixed_number', content.data.fixed_number)
      param.append('level_id', content.data.level_id)
      param.append('food_money', content.data.food_money)
      api.post(content.action, param).then(res => {
        if (res.status === 200) {
          if (res.data.code === 0) {
            content.onSuccess(res.data)
          } else {
            content.onError(res.data.errmsg)
          }
        } else {
          content.onError('服务器端无响应,上传失败')
        }
      })
    },
    checkFile (file, fileList) {
      this.img = fileList
      // 限制上传文件为5m
      let sizeIsSatisfy = file.size < (5 * 1024 * 1024)
      if (sizeIsSatisfy) {
        this.IsFile = true
        this.fileSizeIsSatisfy = true
        return true
      } else {
        this.fileSizeIsSatisfy = false
        return false
      }
    },
    handleSuccess (response) {
      if (response.code === 0) {
        this.IsFile = false
        console.log(this.IsFile)
        this.$message({
          message: '更新成功',
          type: 'success'
        })
      }
    },
    handleRemove () {
      this.img = []
      this.IsFile = false
    },
// 提交表单
    confirm (formName) {
      // 判断验证是否通过
      this.$refs[formName].validate((valid) => {
        if (valid) {
          if (this.img.length <= 0) {
            this.$message({
              message: '请至少上传一个文件',
              type: 'warning'
            })
            return
          }
          if (!this.fileSizeIsSatisfy) {
            this.$message({
              message: '上传失败!存在文件大小超过5M!',
              type: 'warning'
            })
            return
          }
          // 判断是否有上传文件
          if (this.IsFile) {
            this.$refs.foodUpload.submit() // 手动提交
            this.IsFile = false
          } else {
            let data = {
              id: this.food.id,
              food_name: this.food.food_name,
              food_money: this.food.food_money,
              level_id: this.food.food_level.id,
              fixed_number: this.food.fixed_number
            }
            api.post('api接口', data).then(res => {
              if (res.status === 200) {
                if (res.data.code === 0) {
                  this.$message({
                    message: '更新成功!',
                    type: 'success'
                  })
                } else {
                  this.$message({
                    message: '更新失败!' + res.data.errmsg,
                    type: 'error'
                  })
                }
              }
            })
          }
        } else { // 验证不通过
          this.$message({
            message: '验证错误,请检查输入格式!',
            type: 'error'
          })
        }
      })
    }
  }
需要注意的是:http-request是自定义上传动作,如果使用了此参数,则需要在自定义(customUpload)函数内自己上传图片文件及各种信息参数,倘若木有使用此参数,手动提交时就会直接访问action的请求接口上传文件,看你喜欢。(注:自己做上传动作,需要正确处理二进制图片文件,才可进行上传,我这里是使用FormData对象来存储该二进制文件(具体看上面代码的customUpload函数),不知道有木有其他的方法,希望大神可以指导指导。
注:我在上传文件时,时而成功,时而不成功,显示警告是
Provisional headers are shown ,百度查完具体意思是
是因为去获取该资源的请求其实并(还)没有真的发生,所以 Header 里显示的是伪信息,直到服务器真的有响应返回,这里的 Header 信息才会被更新为真实的。 最后查的原因就是php.ini设置的限制图片大小upload_max_filesize为2m,超过2m的就上传不了,但是我代码限制的是5m,故上传失败,所以修改一下配置或者代码就可以了。